 costed plate
Begin with a defined portion
Write down exactly what the guest receives. Include the main component, sides, sauce, garnish and any other ingredient that belongs to the serving. A recipe total is only meaningful when its output is defined. An attractive cost can simply mean that part of the plate was omitted.
Choose a recipe that the kitchen actually produces and start with its normal batch. Keep ingredient preparation states visible: raw, trimmed, cooked, drained or otherwise ready to use. A quantity of cooked rice is not the same purchase quantity as dry rice, and a cooked bacon portion cannot be priced as an equal raw weight without a yield model.
Record the batch output and the serving size in compatible units. If a sauce yields kilograms and the dish uses grams, the conversion is straightforward. If the sauce yields grams and the dish uses milliliters, a density is needed; the unit names alone do not establish the relationship.
Enter the purchase pack accurately
Use the supplier invoice and the actual pack specification. Record net product quantity, purchase unit and pack price. Exclude the carton or container from ingredient mass unless the purchase specification itself is on another explicit basis.
A case description can contain several quantities. For example, the number of inner packs and the mass of each pack together define the total purchased mass. Do not enter the outer case count as if it were the ingredient quantity. Confirm whether the invoice price applies to the case, an inner unit or a weight unit.
Keep the price date and source in your working records. A recipe can recalculate correctly while using an obsolete purchase price. The arithmetic is only one part of the control; current and correctly matched inputs are equally necessary.
Convert purchase cost to usable cost
If preparation removes material, divide usable output by purchased input to measure yield. Then divide purchase unit cost by the yield fraction to find edible unit cost. Apply the factor only to the stage it describes.
Assume an illustrative 5 kg pack costs $20 and produces 4 kg of usable material. Purchase cost is $4 per kg, yield is 80% and edible cost is $5 per kg. A 150 g edible quantity costs $0.75. Those values demonstrate the formula and are not a recommended yield or market price.
If you buy the ingredient already trimmed, use that purchased state as the starting point. Applying the whole-product trim factor again would charge a loss already reflected in the prepared pack's price. A separate cooking loss can still apply if the recipe quantity refers to cooked output.
Use ingredient-specific conversions
Mass-to-mass conversions do not depend on the food. Volume-to-mass conversions do. A cup of flour and a cup of milk do not have the same reference mass, and a packed cup can differ from a loosely filled one.
USDA portion tables provide food and preparation descriptors alongside gram weights. Use the matching descriptor, not just the word cup. If the record describes sliced or mashed food, retain that distinction. When no suitable reference is available, weigh your own ingredient rather than guessing a density.
Count-based ingredients need an each weight only when crossing into mass or volume. If an egg is purchased by the dozen and used by count, the calculation can remain in counts. If the recipe uses liquid egg by mass, use an appropriate edible weight and account for any discarded portion.
Work the ingredient lines
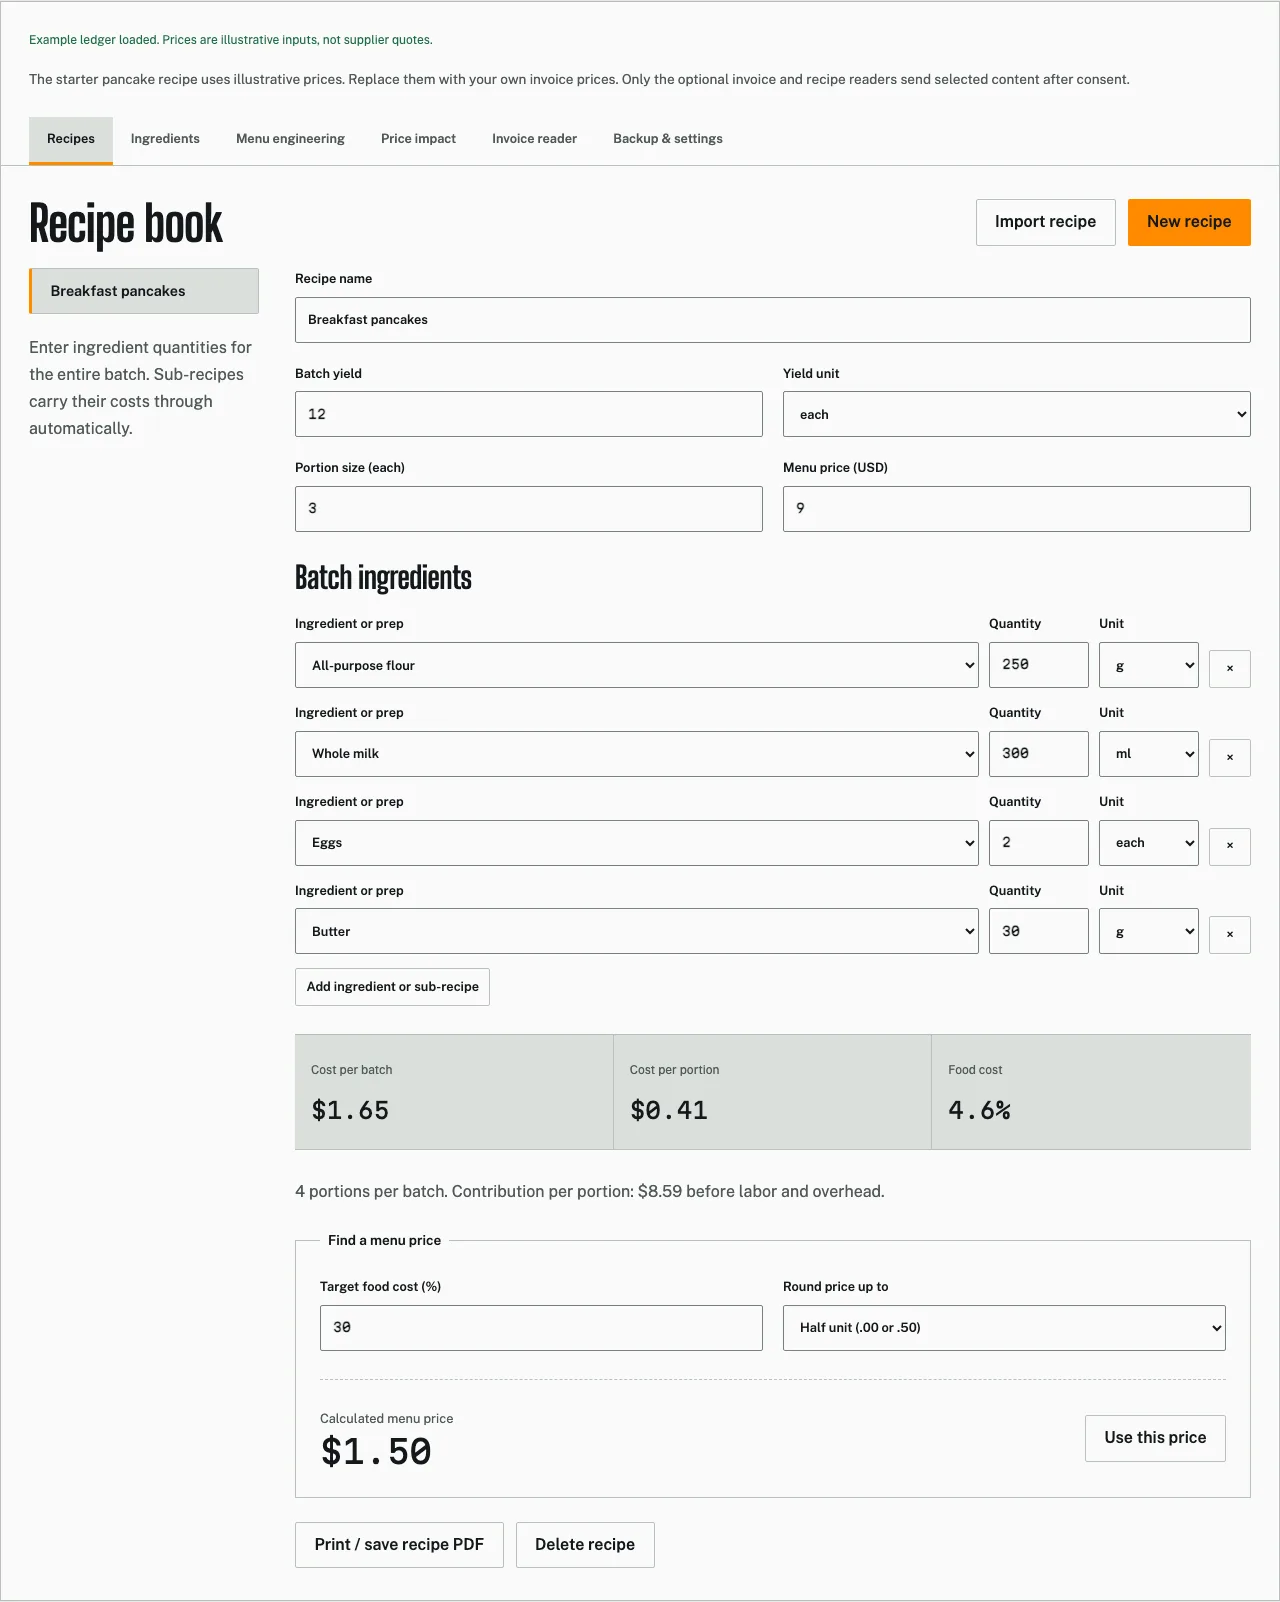
The following original example uses assumed prices and quantities. It is deliberately small so each calculation can be checked by hand.
| Ingredient | Purchase input | Recipe quantity | Line cost |
|---|---|---|---|
| Flour | 5 kg for $8, no-loss assumption | 250 g | $0.40 |
| Milk | 1 liter for $1.50 | 300 ml | $0.45 |
| Eggs | 12 each for $3 | 2 each | $0.50 |
| Butter | 250 g for $2.50 | 30 g | $0.30 |
| Batch total | Sum of line costs | Defined example batch | $1.65 |
For flour, 250 g is 0.25 kg, so its cost is $8 × 0.25 ÷ 5. The other lines follow the same purchase-fraction relationship. The example's no-loss assumptions should be replaced if your measured preparation or handling requires an allowance.
Measure finished batch yield
Assume this example produces 12 pieces and the served portion is 3 pieces. The batch contains 4 portions, so ingredient cost per portion is $1.65 ÷ 4 = $0.4125. Keep that precision during calculation and round for display rather than rounding each intermediate ingredient line too early.
The finished piece count is an assumption for this example, not a guarantee about a recipe. In a real batch, weigh or count saleable output. Material left in a bowl, rejected pieces and other production loss can reduce the number of portions that carry the batch cost.
Do not add a finished-yield loss twice. If the measured batch output already excludes discarded product, dividing the batch cost by that output already spreads the cost over the remaining portions. A second unexplained percentage can overstate the same loss.
Add shared components as sub-recipes
Build a sauce, dough or cooked component once when it is used by several dishes. Record its ingredients and finished yield, then add the required output quantity to each parent recipe. This preserves the connection when a shared ingredient price changes.
Avoid adding both the sub-recipe and all its ingredients to the same parent unless those are genuinely additional quantities. That would charge twice for the component. Also avoid circular dependencies, such as a sauce containing a dish that already contains the sauce; the app rejects them because they do not define a finite cost.
Review the result before pricing
Inspect every line for purchase basis, recipe unit and yield. Check the batch output against what the kitchen can actually serve. Compare a sample calculation by hand, particularly when a supplier changes a pack or an ingredient crosses between volume and mass.
Then enter a selling price and inspect food-cost percentage and contribution. Contribution after ingredients still has to pay for labor and other expenses. A menu price calculated from a target is a scenario, not proof of profitability or guest demand.
Open the costing ledger to build the recipe, or begin with the spreadsheet template. Use the menu-pricing guide for the next decision. Export a backup after confirming the recipe so the working model is not dependent on a single browser's storage.
Retain the recipe specification
Keep the portion definition available to the people preparing the dish. The costing record and the kitchen’s actual serving need to describe the same product. If a side is changed or a garnish becomes optional, update the recipe or create a clear variation. An accurate calculation cannot compensate for a written standard that no longer matches service. Use a measured sample plate to confirm the relationship before adopting the cost for pricing.
Count packs and edible piece weights
A count pack charges for usable pieces. In the app, one recipe each uses one piece from that pack. When converting pieces to grams, enter the edible weight of a piece after trim. That edible weight already reflects the trim, so the app does not apply the weight-yield percentage again to a count purchase. If pieces are discarded completely, reduce the usable piece count covered by the pack price. Weight and volume purchases still apply their edible-yield fraction. Keep the two purchase bases separate when checking a conversion.
Questions from the kitchen
Can I mix cups and grams?
Only with an ingredient-specific reference that matches the preparation. Otherwise weigh the ingredient and use mass units.
Should a sauce be entered in every recipe?
Create a shared sub-recipe when several dishes use the same sauce. Its cost can then update through the dependency.
What if my batch yield changes?
Measure and update the finished batch yield. The same ingredient cost spread over fewer portions raises portion cost.
Sources and method
Checked October 30, 2026. Example inputs and computed results are identified in the text.
- Yield Testing. BC Cook Articulation Committee / BCcampus. AP, EP and yield-cost formulas. Checked 2026-10-29.
- The Principles of Menu Engineering. BC Cook Articulation Committee / BCcampus. Food-cost percentage, menu pricing and contribution margin formulas. Checked 2026-10-29.
- SI Units: Volume. National Institute of Standards and Technology. US customary volume conversions; ingredient density is a separate input. Checked 2026-10-29.
- Product limits and data handling. Costed Plate. Application limits are enforced in the source code. Local examples are explicitly illustrative. Checked 2026-10-30.